Excel to XML component
The Excel to XML component allows you to extract data from specific cell ranges in an Excel document and aggregate them into a single XML file. Each range of cells that you want to include in the XML output is defined by a rule.
Configuration
Each Excel to XML component rule has the following configuration options:
Node name
Each rule starts with a name. The data of the specified Cell range will be wrapped in an XML node with this name.
- Start with a digit.
- Start with special characters such as hyphens or periods.
- Start with any variation of
xml. - Contain special characters other than the periods, hyphens, underscores and/or colons.
Worksheet
Specify the exact name of the worksheet from which the Cell range data will be extracted.
- The special characters
<,>,&and“are replaced with<,>,&and"respectively. - Formulas are converted into their calculated values.
- Numbers are formatted with one decimal place by default, but additional decimals are included if present.
For example:1÷3will result in0.333333333333333.
Cell range
Specify the cell range from which data will be extracted and wrapped into the specified XML Node name.
- Use continuous cell ranges, e.g.
B2:B11. - Non-continuous and single cell selections are not supported, e.g.
B2;B4;B6;B8;B10.
When generating large XML outputs, it is recommended to set the flow's Transport to Synchronous. For example, a worksheet with 200,000 rows and 12 columns can easily produce an XML file of 150MB.
Transpose
Enable this option to switch data from columns to rows and vice versa.
Has header row
Enable this option to use the top row of the rule’s Cell range as the names for child XML nodes.
- Invalid XML characters are automatically removed from header row values.
- Header rows with empty cells will default to the standard naming strategy.
Discard empty cells
Enable this option to exclude empty cells from the XML output.
If an entire row contains only empty cells, the entire row will be discarded.
Using Excel to XML
The example spreadsheet below:
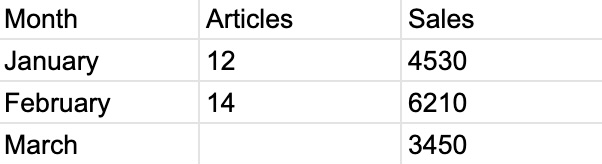
Combined with this Excel to XML component configuration:
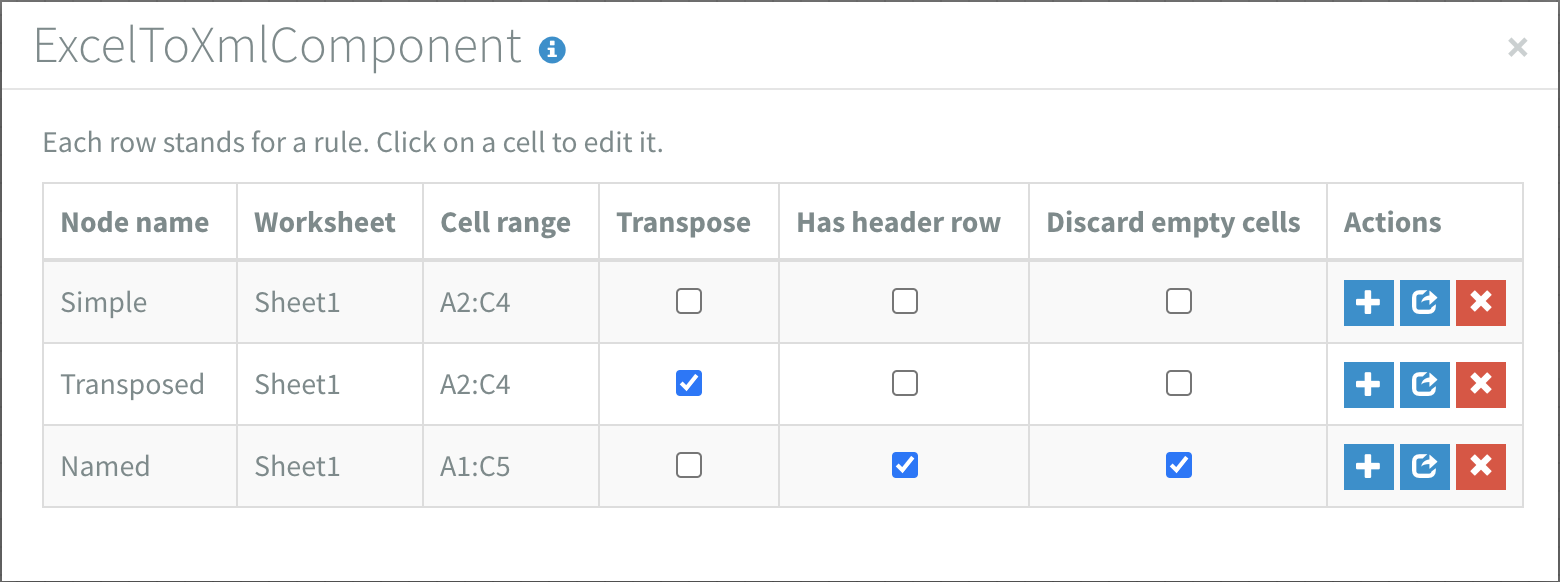
Will result in the following XML:
<?xml version="1.0" encoding="UTF-8"?>
<Excel>
    <Simple>
        <excelRow>
            <cell colIndex="A" rowIndex="1">January</cell>
            <cell colIndex="B" rowIndex="1">12</cell>
            <cell colIndex="C" rowIndex="1">4530</cell>
        </excelRow>
        <excelRow>
            <cell colIndex="A" rowIndex="2">February</cell>
            <cell colIndex="B" rowIndex="2">14</cell>
            <cell colIndex="C" rowIndex="2">6210</cell>
        </excelRow>
        <excelRow>
            <cell colIndex="A" rowIndex="3">March</cell>
            <cell colIndex="B" rowIndex="3"/>
            <cell colIndex="C" rowIndex="3">3450</cell>
        </excelRow>
    </Simple>
    <Transposed>
        <excelCol>
            <cell colIndex="A" rowIndex="1">January</cell>
            <cell colIndex="A" rowIndex="2">February</cell>
            <cell colIndex="A" rowIndex="3">March</cell>
        </excelCol>
        <excelCol>
            <cell colIndex="B" rowIndex="1">12</cell>
            <cell colIndex="B" rowIndex="2">14</cell>
            <cell colIndex="B" rowIndex="3"/>
        </excelCol>
        <excelCol>
            <cell colIndex="C" rowIndex="1">4530</cell>
            <cell colIndex="C" rowIndex="2">6210</cell>
            <cell colIndex="C" rowIndex="3">3450</cell>
        </excelCol>
    </Transposed>
    <Named>
        <excelRow>
            <Month>January</Month>
            <Articles>12</Articles>
            <Sales>4530</Sales>
        </excelRow>
        <excelRow>
            <Month>February</Month>
            <Articles>14</Articles>
            <Sales>6210</Sales>
        </excelRow>
        <excelRow>
            <Month>March</Month>
            <Sales>3450</Sales>
        </excelRow>
    </Named>
</Excel>